Disassembly and Maintenance of Extruders
-
Disassembly of the Screw: To adapt the extruder for different process requirements, a variety of screws are often used on a single extruder. Therefore, the design of the drive system should facilitate easy connection and disconnection of the screw for changing and maintenance purposes.
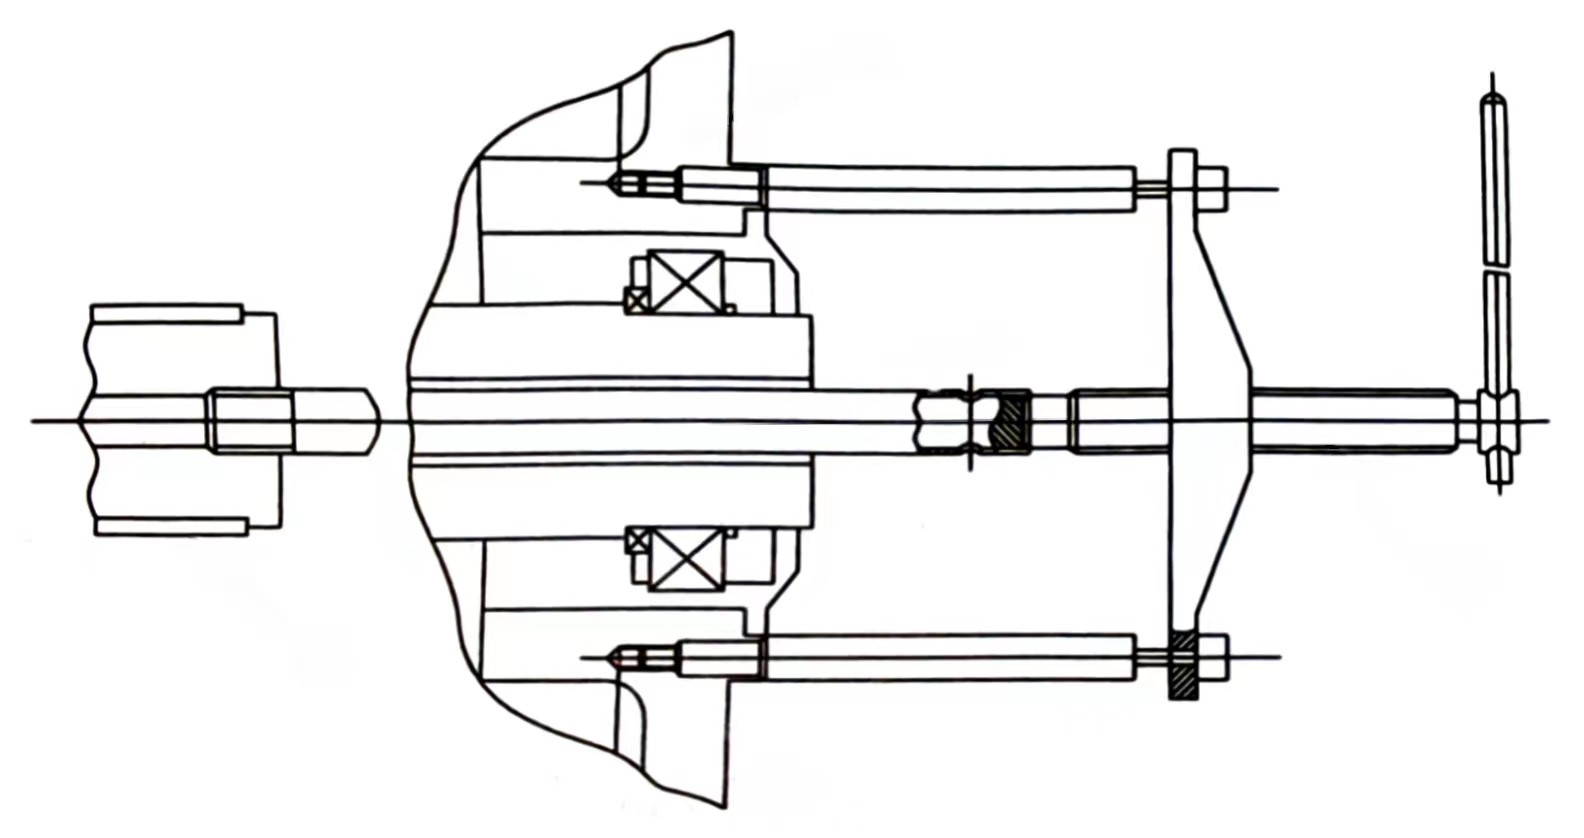
Some extruders are specifically equipped with mechanisms for installing and removing screws. When disassembling the screw, use a specialized long bolt as shown in the diagram. Follow the operating procedure during disassembly; remove the screw first and then the barrel. When installing, reverse the order: first install the barrel, then the screw. Pay attention to the following points when disassembling the screw:
-
Ensure that the material inside the barrel is completely melted before removing the screw from the machine head. For a single screw extruder, remove the screw cooling water inlet and outlet rotary joint first (as the screw requires cooling). Then, use a copper rod to push from the gearbox side through the hollow shaft of the gear transmission to the tail of the screw. Strike the copper rod with a hammer to gradually push the screw out of the barrel, or use a specialized tool to push out the screw. For a twin-screw extruder, a special tool is needed to simultaneously extract both screws.
-
Prevent deformation or damage to the screw during extraction. Use steel ropes covered with rubber tubing, and operators should be cautious to avoid burns.
-
Clean the material off the surface of the screw. Use copper or bamboo tools for cleaning, and do not strike with tools made of steel or similar materials.
-
Measure the outer diameter of the screw, which generally should not exceed the allowable wear limit.
-
For screws that have been in operation for a long time, non-destructive testing may be necessary.
-
Cleaning and Maintenance of the Screw: After extracting the screw, lay it on a flat surface. Use a copper wire brush to remove residual material from the screw. Utilize mold release agents or mineral oil for more efficient and thorough cleaning. After cleaning, inspect the screw for wear. Minor scratches can be smoothed with emery cloth or oilstone. For noticeable scratches, determine the cause. After the screw cools to room temperature, use a solvent to remove dirt from its surface, carefully inspect the quality of the screw edges and grooves, and then measure its basic parameters to analyze wear.
-
Maintenance Considerations for the Screw:
-
Do not forcibly strip materials cooled in the screw grooves, as this may damage the surface of the screw (chrome plating, surface roughness).
-
Only use bamboo or copper materials for cleaning the screw. Be cautious of skin contact with solvents when cleaning the screw to avoid injury.
-
When the screw is not in use for a long time, coat it with anti-rust oil, wrap it, and hang it vertically.
-
Disassembly and Maintenance of the Barrel:
-
Clean the inner surface of the barrel and check for wear and scratches.
-
Ensure that the horizontal deviation at both ends of the barrel is no more than 0.05mm/m, and the inclination direction should be consistent.
-
When assembling the barrel, tighten the flange bolts and apply heat tightening. Perform non-destructive testing or replacement of bolts if necessary.
-
Screen Changer Replacement Device:
-
Dismantle, inspect, repair the screen, and replace it.
-
Ensure flexible movement of the mechanism, appropriate travel, sufficient clamping force between the barrel and the machine head flange, and appropriate assembly tolerance between the screen hole plate and the barrel.
-
The inner wall of the hydraulic cylinder (or pneumatic cylinder) should be smooth. If the seals are severely worn causing oil (or air) leaks, they should be replaced.
-
Dismantle and inspect the hydraulic oil pump.
-
Repair of the Barrel:
-
If the barrel is worn and its diameter has increased, and if there is still a nitriding layer, directly ream the inner hole of the barrel, grind it to a new diameter, and then produce a new screw according to this diameter.
-
For the inner diameter of the barrel, re-cast alloy after machining adjustments, with a thickness between 1-2mm, then finely process it to the required size.
-
Generally, the homogenization section of the barrel wears out faster. This section (5-7D long) can be reamed and matched with a nitriding alloy steel sleeve. The inner diameter should be based on the screw diameter, leaving a normal fitting gap, and then proceed with processing and fitting.
